Monday, December 30, 2013

Busy Bee

We hope you enjoyed a peaceful and family filled Christmas, filled with those you love, celebrating the birth of our King. We enjoyed our Christmas, with each other and family nearby and far-away. Let me tell you skype is a beautiful thing!

For Christmas we like to make presents, but we don't always succeed. Our brothers aren't really the crafty type...but this year Nathania and I had the opportunity to make a Christmas present for our brother, Aaron who sells honey. Currently he only sells honey to his friends and coworkers, and he is working on expanding his hive, but we thought a little marketing wouldn't hurt.

So what did we do? We made him labels to put onto the lids of his jars. He calls his hive the Innes Street Honey Farm...and he only puts the harvest date on to determine a batch...no naming. Andy took a picture of Aaron and was able to edit it until it was more of a black outline. Aaron is very recognizable as he has a very large beard, and we wanted to include that in his label.

I went to Office Depot and got a set of Avery labels that would fit on the top of a four ounce mason jar--the size Aaron uses--and then went to the Avery website to create the design.  It was super easy to use. I was able to fit the writing to the circular label and download the picture we wanted to use very easily.

These were two versions I came up with before I decided on one. But it only took a little bit of time to come up with a couple of versions. 

The printing was a bit trickier. I would print out a couple of trials on a scratch piece of paper if you don't want to waste any labels--it doesn't always line up with the labels and you may have to adjust the settings a bit.

This was our final product:


We hope Aaron likes them and uses them as well.
Sarah

Friday, December 13, 2013

Craft Fairs 2013

To date, we have done two of the three craft fairs we signed up for this year. We've really enjoyed them and due to us not being as big of procrastinators as we have been in the past, our stress level is significantly lower.  We'll figure it out one of these years:)

Our first show was at Anchorage City Church...and let me tell you it was busy. So busy we didn't get a picture of our booth. The only picture I have it from the day before when we weren't completely set up.

We made a wooden fence like display again this year, but made it significantly bigger.  It allowed us to use the vertical more effectively. The only down side to a display like this is that it is a pain in the rear to set up and take down.


Our second show was a two-day show in Seward. We do this even because it's fun. We get to get out of town for a bit of a girls weekend and in general who doesn't like to do that? Now for us this means driving 2 hours south, but its still fun to spend a weekend with your best friend right? We have some pictures but the sister won't put them in here...ahem...we may update later:)

We used the same display, but forgot part of our tree display. Not able to drive back home--too long of a drive and the highway was closed, we rigged it with a pair of Aria's socks and some twine. It was a make it work moment.


Our third and final show is this coming Saturday at Cornerstone Church here in Anchorage.  We would love to see you there!


Wednesday, December 11, 2013

Christmas Ornaments on the Cheap

As my husband likes to say...I'm a little bit of a hoarder. I buy things thinking about the future, especially when the price is right. Things may have gotten a little bit out of hand, but in reality I have made lots of headway in the stuff department. I'm actually using the things I bought and not buying more.

So all of that was to say that last year after Christmas, Nathania and I found these ornaments at Target for less than 10 cents a piece. I bought a whole bunch in them with plans of using them with my students at school. Which I'm still planning on doing, but recently the girls from my small group at church came over to make some ornaments for a service project we are doing.


(I don't know how to flip it...)

Before they came over I looked through my crap craft room and found Christmas fabric scraps, yarn and ribbon, pulled out some felt scraps and of course a glue gun. Some of the other ladies brought in yarn and some little odds and ends to decorate as well. Let me tell you...I have a ridiculous amount of fabric and crafty things...but they came in handy for a project like this.

There were no rules in decorating these ornaments, which was really cool because everyone came up with a different decoration for the ornaments. All similar but still each one unique. Love it.


The overall cost of each of these ornaments was 10 cents. If you had to buy some fabric or paint or such they may be more, but its kinda fun to see what you can find around the house to decorate something like this.

Anyone else doing cheap crafty things lately? Love to hear about them!


Thursday, October 24, 2013

Forest through the trees...


We have had a gorgeous fall so far...


The colors were amazing! Probably the best colors I've ever seen since being up here. 
Now, all you people in the midwest and out east, I know you have better colors...reds and oranges...which I miss, but for Alaska, this years colors were phenomenal!

And then you know what happened?

Wind.
Lots and lots of wind.
House shuddering, gusty, loud, obnoxious wind.
It stripped all of the trees of their colors and this is what we now have to look at...


So we've been making trees of our own.

Happy colorful trees


Special trees for your tree...your Christmas tree that is:)

Saturday, October 19, 2013

Here birdie, birdie...

We've been busily crafting away on mittens, slippers, Christmas trees and such to get ready for the craft fair season.
But I thought we needed to add something to the repertoire.
A little bird perhaps?
Yup, I think a couple of bird ornaments were just what was needed.

Love birds or Turtle Doves...whichever you prefer.
 
Like them so much you want one for your mantel?
 
Yup...we got those too.
 
Our little birds will be making their debut at the Alaskan Christmas Bazaar on the 9th of November.
 
Sarah and Nathania

Monday, September 9, 2013

Recycling center...

I'm about to show you a mess...no cleaning up before this post:)
This shelf has housed our recycling before it goes outside into the big recycling bin for the last two years. As you can see...it has also become the dumping grounds for everything else as well. Bottles and paper were always falling off and it was getting really annoying.
So one day I was in the garage and saw a can of stain left over from doing our headboard. Not one to want to waste anything, I got the brush out and decided to stain the shelf that held our recycling...so at least it would look nicer!
Thinking I needed to do something to organize the chaos that was the shelf...I moseyed on over to Joann's and got two unstained crates.  Which I then proceeded to spray paint with the purple spray paint that I had in the garage...we're going for low cost here...but what happened?
 
Not enough spray paint. So I got a black can of spray paint out and it became a hodge-podge paint job of what was in the garage. And then I loaded it all back into the house...
 
Doesn't it look better? I'm not super sold on the purple, but I think it's kinda funky and am gonna work with it for now. It has made recycling so much easier! All we have to do is take the crate down and dump it in, instead of awkwardly carrying as much as you could, dropping something every two seconds!
 
You know what's even better? It only cost about 14 bucks. (crates were on sale).
Woohoo!
 
What do you think?
Sarah

Sunday, September 8, 2013

Newest project: Wool Skirts

As promised we have done some new projects...hopefully you saw the hats!
The other new product we're working on is wool skirts for little girls. These skirts fit a three year old... Aria. They have a 21 in. waist and go to her knees.
We can make smaller ones and possibly adult ones, but we wanted to know what the general consensus was.
Without further ado:
Rosy Ruffle

Twirly Christmas Skirt

Asymmetrical Flowers
 
Please let us know what you think! We want to know if they would be worth selling at the craft fairs this year or not.
 
Sarah and Nathania
Saturday, September 7, 2013

Fall is upon us

Fall is upon us...at least up here in Alaska.

Which means, rain, the fair, school starting, us attempting to keep up on blogging, rain...and by the time you all have "fall" we will have snow:)

Fall also means the beginning of the madness that is craft season.
Long nights, wool and fabric everywhere, panic....
You think I jest, but we are the biggest procrastinators on the planet, but we really have had two years which that is the case. Most people would learn and work ahead of time, at least those who value their sleep...which we always intend to do, and should, because let me tell you the husbands are not too keen on the living rooms looking like crap for the next three months.

And amazingly enough I have done just that...Mom don't die of shock...we are well stocked on headbands and wreaths. I've been after Nathania to get started on the ornaments, and I think she has 4 cut out!

We also have been working on some new projects.

Projects that we would like opinions on. Please, please let us know what you think...be brutal because we want to make things that are liked...and not waste time on the others.

Project #1 - winter hats
Made with a wool outer layer and fleece inner layer. We have 2 sizes adult and child at this time. My apologies for the pics...I hate taking pics of myself :) and my little model doesn't stay still long or enjoy modeling unless bribed with candy...so I'm ok with some blurry ones! 

Let us know what you think and more projects will be coming shortly! 

Nathania and Sarah


My friend zucchini!!

Tis the tail end of zucchini season here in Alaska and this year my plants blessed me with lots and lots of zucchini.  Not so much that I was out in the middle of the night blessing my neighbors with zucchini but enough to have me scouring Pinterest for some new savory and sweet recipes. I tried out a lot of new recipes and decided to share them with you , just in case you might still be up to your ears in zucchini!

Super easy side dish and it was a hit with everyone.

A perfect snack for little hands!

I loved these!! I made them in a regular muffin tin rather than a jumbo tin and would watch them closely while baking. My first batch was a little dry. Second one turned out perfect! I would also add another banana and a bit more vanilla.  Definitely making these again!!

This is the moistest bread and just might be my favorite!!  I would put this one on the top of your list!

I inhaled these! So delicious and low cal!

I used green striped squash from the garden instead of yellow and it was perfect dish for the cooler evenings we are starting to get! It was a hit with the husband as well which is a challenge especially when it is a meatless entree :)!

7.  Sausage stuffed Zucchini Boats - Skinny Taste
I could eat these everyday!


8.  Zucchini Bread
recipe courtesy of Deb Feys

2 loaves
mix wet ingredients together well
3 beaten eggs
1 C oil
2 C sugar
2 t vanilla
Dry ingredients : mix well and add to above
3 C flour
1 t salt
1 t soda
2 t cinnamon
1 1/4 t baking powder

mix well and add
2 C shredded/grated zucchini

bake 350 degrees  for 1 hour -  I baked it for 50 mins and it came out perfectly moist!


I hope you have fun trying out some of these recipes and If you have some favorite zucchini recipes I'd love to hear about them!


Nathania


Monday, August 19, 2013

oreo madness

As of late I'm slightly obsessed with trying new recipes, most coming from Pinterest but not all.  I've attempted to recreate some homemade oreo cookies, several zucchini recipes, surprise surprise and a bread recipe.

First the oreo. I was introduced to the most delicious homemade "oreo" cookie at the Cake Studio in downtown Anchorage by my sister Sarah. It is to die for and it's a good thing they are located downtown or I would become a daily fixture! They are made with the chewiest but firm chocolate chocolate chip cookies and a thick but not too sweet white filling. I wish I had a picture to show you of this delicious creation but alas they don't last that long once they are in my hands :).
   So in love with them I decided to try and recreate them. After looking at multiple homemade "oreo" recipes I followed the basic filling recipe but found what I thought might be the winning cookie recipe. I wanted a cookie not a wafer like most of the recipes called for. I found the filling was too sweet for my liking and just tasted like powdered sugar so I added some cream cheese but then couldn't get it to thicken up for the life of me :(.  So on my second attempt I made the basic filling and then added just a couple of spoonfuls of my first filling attempt and it turned out better but not as thick I wanted. But by then my cookies were done and I was impatient to sample my wares. Tasty though they were my cookie wasn't as chewy/firm as I wanted, it was more on the cakey side and the filling definitely needed to be thicker as it squished out but they were definitely edible! Tweaking is definitely needed but that will have to wait until my waist recovers...I may have sampled a fair number for quality control! Anyone have any suggestions to help me in my quest to perfect my recreation?


stay tuned for more recipes
Nathania

Tuesday, July 2, 2013

O Sewdutch sisters, Where art thou?

Well, we've been awful at updating the blog...
but that doesn't mean we haven't been doing anything!
 
As national news has put it...Alaska is baking...
 
Or at least was.
 
For the entire month of June we had ridiculous temperatures and beautiful days. It was great except for the couple of days where it got so hot it was unbearable...80s up here is unbearable. We don't have AC in most buildings...so its hot. But because it was so beautiful, we've been out doing all kinds of things...hiking, camping, fishing, painting, biking...yah know the stuff we can't do in the winter!
 
I also was on my own for a couple of weeks as Andy climbed Mt. McKinley. (if you want to check out his amazing pictures....go here). So I got down to some projects that I had wanted to do for a long time. My pictures are a little crappy due to the fact that he brought the camera on his expedition. So I phone pictures it is.
 
I have multiple post in the wings so if you've stuck around there will (fingers crossed) be posts the rest of the week.
 
To begin I have the remediation of the ugly purple/maroon door.
 
This is the ugly purple/maroon door.
 
I may have forgotten to take a full picture of the door...and had already started painting, so this will suffice for a close up.
It was super crappy paint job. You could see the brush strokes and the white underneath...and the paint was all over the handle and lock. Sloppy.
 
Now, our house is tan with forest green trim. Not a whole lot goes with the lovely green. Even the gutters are green so I can't just paint the trim.
 
I thought about what color for a long time. Red would look to Christmasy. Yellow, Orange and Purple were out.  Brown was boring, and so was Green. So I decided on a Blue. It was a perfect choice. It looks way better.
I even took the hardware off and cleaned it up with some citraslov. It just looks classier overall.
No paint splatters on the handle, a full coverage of paint...and just all-together better!
 
Wanna know what's even better? It took about 2 hours to do the whole thing. Two coats and all...cause it was hot that day and the paint dried in record time:)
 
I love projects that can make such an impact but take little to no time at all.
 
What do you think?
Sarah

Tuesday, May 14, 2013

Flubber!

After a much too early wake up by little Miss Aria, 6am seems to be her fav time of the day nowadays and no nap we were not best of friends by afternoon! What to do when allotted tv time is done and I'm too exhausted to do much? Open up my trusty pinterest account to find that recipe for flubber! It was soo easy and Aria is having a blast with it and I must admit so am I! I will definitely be making this again once this batch has gone to flubber heaven.

All you need is white glue, food coloring, borax and hot and cold water.
Flubber
3/4 cup cold water
1 cup elmers glue
liquid food coloring
1/2 cup hot water
1 teaspoon of borax(you can find it in a box in the laundry aisle)

 In bowl number one mix glue, cold water and food coloring. In bowl number two mix the hot water and borax and mix til the borax has dissolved.


Then pour the glue mixture into the borax solution and mix

and mix
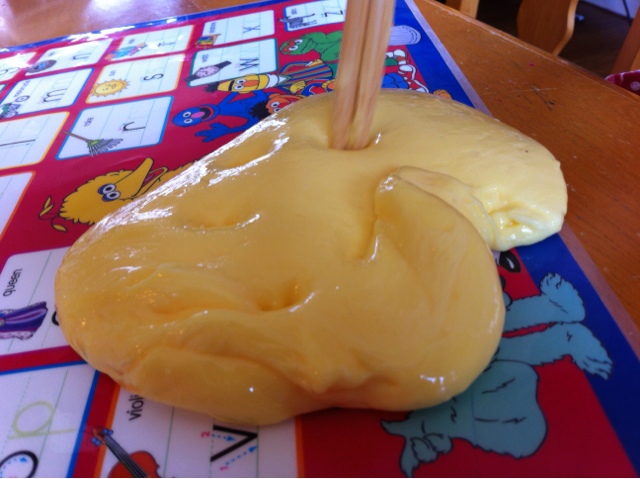
until you get this! 

I halved the recipe and it turned out great. On the website it said to pour off any excess water but I didn't have any.  Have fun!
Nathania

Wednesday, April 10, 2013

Stroller Seat redo

So Make do March was officially a bust this year. I blame the lack of sunny days that then led to a significant lack of productivity and I'm sticking to it! 
 
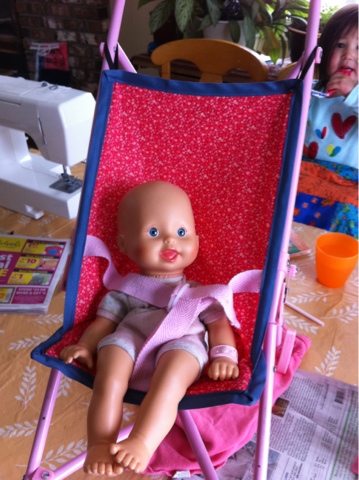
I've been eying this projects for a long time. It's hard to tell from my stellar before pictures that this is a well loved doll stroller seat.  It suffered multiple traumas after Aria decided it was made for her! :)The elastic holding it up on the handles was all stretched out and the fabric had torn on the seat making it difficult to use.


I took the original seat apart and used it as a pattern and saved the straps and reused them.  I used some pink fabric and blue binding I had in my stash along with some leftover elastic and voila, new seat done. Aria loved it and immediately got her baby and put her in it. Now that's what I call success!


Nathania

Thursday, March 21, 2013

Make do March...what to do when insomnia hits? Update my Christmas Album of course!

I love getting Christmas cards!  It's great hearing from friends and family and I love seeing how families have grown and grown up.  I hang them up on my cupboards to enjoy them during the Christmas Season but what to do with them when Christmas is over? I hate throwing them out so several years ago I started a Christmas album.  It's a great way to use up my vast stores of scrapbook supplies and it's fun to look back on years past!


What do you do with your Christmas cards?

Happy make doing!
Nathania

Wednesday, March 20, 2013

Make Do March...getting Granny done

Yay! I finished the granny square afghan. It is the most eclectic, random afghan ever...but to be honest...that's why I love it. Now the real question is...do you?

 
I started this crazy-take-forever project in the beginning of February...with the intent to use it for Make Do March. I started with putting the squares together in long strips with the white. I had a huge skein of white yarn and thought I could do the whole thing with the white.
 
Yeah not so much.


So when I started doing the cross portions of the framing part I started from the middle with the white...knowing I wasn't going to have enough, but thought it would be nice to have in the center.
 
Then I grabbed a skein of the turquoise that I had and completed one side and part of the other.
But it wasn't enough.
 
Then entered the dark blue.


I edged it with the dark blue and green and called it good.
Its a super comfy lap blanket. Not big enough to cover my 5'11'' frame...but close:)
 
Considering I wasn't sure how to put them together when I started...I really like the end result!
I don't think I'll be doing any crochet projects in the near future. I think I've filled the years quota and then some.
 
Happy Make Doing!
Sarah


Tuesday, March 19, 2013

Make do March....DIY body wash

Another pinterest pin completed, yippie!  I found this post on DIY Dove Body Wash recently and it was so simple I had to give it a try!! Grate soap, dissolve in water, let cool, add to chosen container and done!!


I only had 2 bars on hand so I decreased the amount of water I put in.
I forgot to take a pic of the melted phase but it was pretty thin but thickens up nicely once it cools.  So for 3.88  I ended up with a full body wash container plus some.  Much better than 6.99 for a big container! It works really well, doesn't suds up as much as store bought but gets you nice and clean!  I just bought some scented Dove bars and can't wait to try using them!  Bonus was that they were on sale for 6.99/6 bars with a coupon for another $1 off. Woohoo!!

I reused my old body wash container and stored the rest in a mason jar.

Happy Make Doing
Nathania

Monday, March 18, 2013

Make Do March...random here we go..

So I am in the midst of a couple of projects, plus I'm not feeling to hot...so you're gonna get the most random post I think I've ever written:)

Enter the bad iPhone photos...

I made this very large poof. It's extra wrinkly in the picture but you get the point:) I'm in the process of stuffing it. I am not allowed to buy stuffing...so I'm stuffing it with plastic bags. Good way to recycle. right? The only down side is that it requires an astronomical amount of bags. So it's half stuffed. I will update when its fully stuffed. Mind you it may not be until December.

I was driving along the other day and saw this beautiful van...with the above written on it. The passengers looked a little sketchy...so I took the picture sneakily:)
Do you see things like this where you live? Or is this a purely Alaskan thing?


For spring break, Andy and I went north a bit to Talkeetna. We had fantastic weather. Look at the view! The mountains from the left are: Hunter, Foraker, and Denali/McKinley. They are huge!


Denali
SOO big. We can actually see it from Anchorage, but being so much closer it is so much grander!
You may be getting a whole lot of posts about this mountain...as Andy will be climbing it this June.

What have you been working on?
Sarah
Related Posts Plugin for WordPress, Blogger...